One of the ways I managed to "pay it all back" was definitely eating for free or alternatively, the ancient practice of "half eating" which I assume was a thing because it definitely works where you only eat half your meal and then eat the rest for dinner! Also an excellent strategy for weight loss.
Example 1: You landed a job at a legitimate company. Sometimes, they have free lunches! Always take extra back to your desk. Eat it as a snack or, alternatively if you can snag an extra leftover sandwich, your dinner.
Example 2: Your legitimate company hosts lunches or dinners for clients sometimes. Always wait until the event is over and go up and grab some of the food. Often this just gets tossed, so you are doing the environment a big favour as well as your pocketbook.
Example 3: You need to buy lunch. You know you could have packed a PBJ but who has time for that sh!t you are busy at work! Just make sure you get the bang for your buck. In other words, buy sometimes that will cost less than $5 for lunch. Meatball sub sandwich. Soup and bun. Pho (save the second half of pho for dinner!).
Example 4: Make an enormous amount of food on the weekend. Bring it to work every day that week. Pay $25 off your loan.
Example 5: Go to your parents place, if you've got some local. They always feed you!
Example 6: Go vegan, or nearly. Meat is expensive!
Example 7: Make your own bread. It can actually be way cheaper than the storebought stuff and tastes about a million times better.
Example 8: When your friends want to go out to eat, choose a place with happy hour.
Thursday, February 2, 2017
Sunday, November 29, 2015
You don’t miss $4.33
This really should be included in the “You Don’t Miss $20”
section, but I considered that it really should have is own section because it is a whole new level of thinking.
The concept is simple and the same as the $20 concept – you
don’t miss this money in your account.
So, after the $20 was sent over to my friends, I would check to see the
amount I had left. If it wasn’t an even
number, then I would round it down and send that money to the student loans
folks. Honestly, I never see those extra digits. They mean nothing to me. If somebody said to you "What do you have saved for when you travel to Thailand?" you won't respond "$4,678.32" you will respond with "around $4,500". Your mind likes to round down. You want to be comfortable if you make an error, but you also just can't remember all those digits. It isn't natural for most people.
So, every time I signed into my bank account, I would do the $20 trick to my student loans, I would make the required payments, and I would then look at my account balance. $154.33? Perfect. $4.33 into the student loans. This was likely done three times a week, and probably
averaged about $5 every time I did it. Pennies,
amiright? Why on earth would I read this stupid blog with its stupid self-righteous voodoo on paying off loans. It can't be done any faster than I am paying off my loans now, right?!
Wrong.
$5 x 3 x 52 = $780
In one year, doing this ridiculous round down function paid
off to the tune of what is likely $780.
When you apply the same calculations, I was saving this much in
interest:
$39
Hardly interesting, you might say. But you are also paying off some of the principal. Or, you are just paying off the interest and the rest of your $$$ will go to your principal.
Over five years, the savings on interest are closer to $200. That means you are done paying off your student loans approximately 1 month earlier! It seems like small potatoes but everything adds up. Because $780 per year for five years means that you have paid off an additional $3,900 in your loans. That means you have shaved almost TWENTY months off your student loans. Yes. That's right. Suddenly you are debt free (or, student loan debt free) over a year earlier than anticipated.
I can’t emphasize this enough – it’s the small things as
much as it is the big things, and its getting that money out your hands and
into the hands of the person who will gladly suck at the teat of your interest
payments if you let them. If I walked up to you right now and said "give me $200" would you say yes? Of course not. But that's what you are saying to the student loan people (ie banks) every single time you pay interest when you could have avoided it.
My motto is always this – the best way to fight the banks is
to pay them off. They hate people who
are debt free.


DIY - Reupholster Dining Room Chairs
We discovered we needed a new dining room table when E invited his whole family over for lunch in the not so distant future. Doing the math with our seating options, I quickly discovered we did not have the space to seat more than six people, max.
I also desperately wanted a hutch to put in all of my Nana's gorgeous china. From my quick review online, I realized that this was going to be expensive if we didn't do it on Kijiji.
I found the most amazing antique hutch in the world, that came with a nice dining room table with two extension leafs, and six chairs. One of the chairs even had arms on it. I was in love.
However.... the pattern on the chairs was a different story. When we were looking at the set, the woman proudly told me that it had been recently re-upholstered. I could tell from looking around her very beautiful home that it was re-upholstered to her tastes, not mine. Fortunately I still have one picture of the fabric... basically a salmon pink with weird little blue flowers on it. We scooped up the set and I set to work researching how hard it was to re-upholster dining room chairs.
The answer? It is shockingly easy to do!
I recommend watching some youtube videos, such as this one or that one. It was honestly so easy. The only investment you'll likely need to make it a staple gun and some new fabric, depending on the quality of the stuffing in the chairs (because these had been re-upholstered recently, I didn't need new foam).
Basically, you start by popping out (or in my case, unscrewing) the fabric seats. Then you flip them over and start taking out the staples. This was a painful process as there was a LOT of staples. From what I can tell, whoever re-upholstered these chairs was about as much of a professional as I was, and probably didn't bother to watch the aforementioned very helpful youtube videos.
I didn't take pictures of the whole process - at the time, I was really just obsessed with getting this done in time. The youtube videos will honestly show you the steps to follow. I will say that after I did it, I felt less nervous about the colour I chose because now I know that if I don't like it in five years I can just pop them off and change them! It is quite liberating to know that I have that option.
The one thing I still have left to deal with is that bench...


I also desperately wanted a hutch to put in all of my Nana's gorgeous china. From my quick review online, I realized that this was going to be expensive if we didn't do it on Kijiji.
I found the most amazing antique hutch in the world, that came with a nice dining room table with two extension leafs, and six chairs. One of the chairs even had arms on it. I was in love.
 |
| Original fabric - Salmon Tulips? |
The answer? It is shockingly easy to do!
I recommend watching some youtube videos, such as this one or that one. It was honestly so easy. The only investment you'll likely need to make it a staple gun and some new fabric, depending on the quality of the stuffing in the chairs (because these had been re-upholstered recently, I didn't need new foam).
 |
| Using a "tool" to take out the staples |
Basically, you start by popping out (or in my case, unscrewing) the fabric seats. Then you flip them over and start taking out the staples. This was a painful process as there was a LOT of staples. From what I can tell, whoever re-upholstered these chairs was about as much of a professional as I was, and probably didn't bother to watch the aforementioned very helpful youtube videos.
I didn't take pictures of the whole process - at the time, I was really just obsessed with getting this done in time. The youtube videos will honestly show you the steps to follow. I will say that after I did it, I felt less nervous about the colour I chose because now I know that if I don't like it in five years I can just pop them off and change them! It is quite liberating to know that I have that option.
The one thing I still have left to deal with is that bench...


Tuesday, October 27, 2015
You Don't Miss $20
One of the more unusual ways I found myself able to pay off
my student loans was by paying $20 to my loans every time I signed into my
online banking. That was on average
probably 3 times a week. I figured that
since I never seems to miss $20 after I had bought a big lunch, I probably
wouldn’t miss it if I sent off $20 to the student loan every time I signed
in. Twenty bucks isn’t a lot these days,
is it? It's barely enough for a ramen bowl worth tip. But let’s look at that number
over time.
$20 x 3 (per week) x 52 = $3,120
That’s right. By
depositing $20 measly dollars when I was already
signed in to my online banking, over three grand was paid off my student
loans within a year. But that’s not the
only benefit.
Interest on your student loans is essentially charged “per
day”. I remember realizing that for
every day I had my loans, I was being charged $6 in interest. EVERY DAY.
I couldn’t believe it. By paying
$20 a day, you are paying off more of the principal of the loan. So, for the $3,120 extra I deposited to my
loan payments, I actually saved (assuming I paid on the last day of the year
instead of the first because even though I like savings I don’t like math):
$3,120 x 1.05 = $3,276 ($156 minimum in interest saved!)
But, that’s just for that year. Imagine if you paid only the minimum on your
student loan for the next five years and that $3,120 is the last to be
paid. The savings actually look like
this:
$156 x 5 = $780.
So, you have paid off your student loans approximately (if
your minimum payments were anything close to my minimum payments) 4 months
early. Further, the student loan folks don't penalize you for paying $20 a day. It is basically FREE MONEY because you won't even notice its gone. Sick people like me actually enjoy the hassle of knowing the transaction is taking place for so little money.
I am hoping I have gotten your attention on the interest savings alone, but let's look at the payment on the principal.
$20 x 3 x 52 = $3,120
That is a sweet chunk of change in one year. That alone shaves 15 months off your loans. But just imagine doing that for five years: $15,600. I don't care who you are or where you went to school. You have paid off a significant chunk of your loans by paying $20 to the man every time you signed in to bank.

If your wallet is getting a bit tight, you will find ways to cut back. You won't buy that new shirt. You will drink wine at home with your friend for $10 each instead of $25 each plus tip. You will opt for the soup instead of the prime rib meal at lunch. Just put the $20 to the student loan every single time you sign in. You won't miss it (unless you have a family to feed in which case much of my advice can be ignored as you have a real family to budget for).
The pride you will feel in knowing that for every $20 you are putting in you are saving $1 in the next year should keep you going. See it as the reverse savings plan and watch that debt chip away.
The pride you will feel in knowing that for every $20 you are putting in you are saving $1 in the next year should keep you going. See it as the reverse savings plan and watch that debt chip away.
Sunday, October 25, 2015
IKEA hack - Kivik Sofa (DIY arm wrap and side table)
Of course, with one Ikea hack, you find another, and it wasn't long during my research on Ikea Kivik sofas that I discovered the "custom arm wrap" on Etsy. There are a few artisans who make these glorious items, at a cost of approximately $200 each. Since I knew I would want at least two, I realized it was going to cost about $400 (plus shipping) I obviously put off this expenditure.
It wasn't long before I was really thinking about these beautiful wooden arm wraps/side tables again. My lovely dog assisted in this, as she had managed to chew/mangle the edges of the sofa when we weren't looking. (I know, I know, don't let the dog on the sofa...). All lack of dog-parenting skills aside, I was humming and hawing about how to hide the marks, and remembered the arm wraps.
But, again, the cost held me back. So, when I discovered this blog on how to do an arm wrap DIY, I was intrigued and immediately saved it to Pinterest. But I was nervous.... I don't know how to cut wood! I didn't want to buy a saw and two saw horses! These small thoughts held me back.
I started telling a colleague (the same colleague who gave us our lovely dog) about how she chewed the couch and how I was considering these wooden arm wraps. I showed the blog to her and mentioned my concerns, to which she basically responded "that is literally three pieces of wood glued and then screwed together - just get Home Depot to cut the wood to size for you, a three year old could do this project". With that inspiration, I made the trek to Home Depot.
Now, in hindsight, I should have brought a tape measure to Home Depot. I assumed that 10 inch wide wood would be 10 inches wide, when it, in fact, is more like 9.25 inches. So, the first piece of wood I got cut was sort of a waste (although I am trying to make some sort of artsy project out of it...). Overall, the materials cost about $75 but if I hadn't made that mistake it would have been more like $60 (although I already had lots of sandpaper). I used a cheaper wood (pine). I screwed the pieces together instead of using other recommended fancy wood putting together techniques. But, in the end, I learned a lot:
1. When they tell you to sand with the grain, sand with the grain;
2. Bring a tape measure to Home Depot to make sure you buy the right sizes regardless of what is indicated on the sign;
3. You can save big bucks if you are prepared to live with something that doesn't look as good/finished as what you see on Easy (less than $40 per wrap was the total cost); and
4. Don't let yourself get discouraged - you are so much more capable than you give yourself credit for.
I am not going to give a step by step on how I. made it, as there are lots of blogs out there that you can find (Google: DIY couch arm wrap). But to encourage you, I want to post pictures of the end result, which I especially like because I managed to stain them to be a near-match to the legs!


Tuesday, September 1, 2015
IKEA Hack - Kivik Sofa (New Legs)
After E and I bought our new home and before we moved into
it, I spent literally weeks trying to decide what to do with the living
room. I wish I was kidding but it was
almost a full time job pouring over blogs and Houzz to try and determine the
answer to my many questions like:
-
What colour sofa should I get for white walls
and light flooring
-
Is leather better than fabric?
-
What size of sofa should we get?
-
Should we do one long sofa and two arm chairs or
one loveseat and two arm chairs or two matching armchairs?
This is just a sampling of the questions that really kept me
up at night. Hilariously, I had never
taken an interest in house décor before this point in time, unless you could
all the posters I bought at the college poster sales (back when buying posters
off the internet was not a thing – I know, I am dating myself).
Anyhow, after much agony and deliberation I finally decided on two matching loveseats… but did you know how many sizes of loveseats there are?
Some are big. Some
are small. I decided that as we were on
a budget, we should go with a fabric sofa.
Enter my work colleague who rescued precious dogs from the
Turks and Caicos and was looking for an owner.
Introduction – my allergies. I
had dogs growing up and knew first hand the importance of leather sofas and hardwood floors to my
survival. So, the beautiful fabric sofa
from a brand name store I wanted? No
longer an option.
What is a girl to do?
I was back to square one spending hours researching my options. Eventually I settled on (I am sure you have
guessed it as I now realize the title gave it away) IKEA leather. I then had to agonize over what type of sofas
to get from IKEA. Fortunately there is no shortage of reviews and opinions and DIY on IKEA sofas out
there, so I recommend visiting HERE and HERE for more information.
We decided to go with the Kivik, after I determined that the
measurements of the Kivik were absolutely mid way between a normal love seat
and a sofa, which was exactly what we
needed for our strange narrow space.
Plus, you could sit on the wide arm chairs and E of course did the “lay
down and relax test” and he was happy with it, even though it was certainly
smaller length wise than he would consider ideal.
Hilariously, despite the fact you are getting an entire foot
less of sofa, you only save 20$ on the loveseat over the sofa. I mean, part of that made sense to me, but
the part of me that wished we had a slightly wider house was pretty upset about
the whole thing.
Now, the one thing I had found during my IKEA research was
an IKEA hack – replacing your original IKEA legs (blocks of plastic
sadness) with fancy new legs. After a
lot of research, I ended up caving and going with Uncle Bob’s Workshop, in the
hopes that his design would ensure the stability of these precious $979
couches. You can find the link HERE, but
as a warning – he is usually several months behind on his orders due to his
popularity and the fact Uncle Bob is really the only employee from what I can tell.
Once they arrived, months later, I re-agonized over the colour. Did it make sense with our light
flooring? Would it look strange? In the
end, my research (see a pattern here with me?) indicated the resounding conclusion to this concern is “Who
cares it all looks like wood anyways and wood almost always matches” so I
decided to try to put them on.
The process is smooth enough, although I highly recommend reading
Uncle Bob’s instructions before attempting to install on your own. That being said, clearly I did not do that, and I still got them on
by myself. One important thing to note
is that the Kivik apparently has two sizes of adapters and I thought I had to
buy the 2cm size – in the end I was the 1.8cm size. What is a girl to do? I had waited for months for the legs. So, I got out the sandpaper and I and watched Netflix reruns while sanding
down to the appropriate size. How can
one be both patient and impatient at the same time? I have done it.
The result? Not what I was expecting, sadly. The Kivik sofa is a bit clunky. After I put the legs on, I wished I had
considered buying a wider, more blocky leg to match. I could likely have returned them to Uncle
Bob to get a different style, but I didn’t bother because I live in Canada and
it costs approximately a million dollars to return things to America unless you conveniently live within 50 kilometres of the US border (I do not). Plus it is possible that buying a thicker leg would have just made it look more clunky.
 |
| Side |
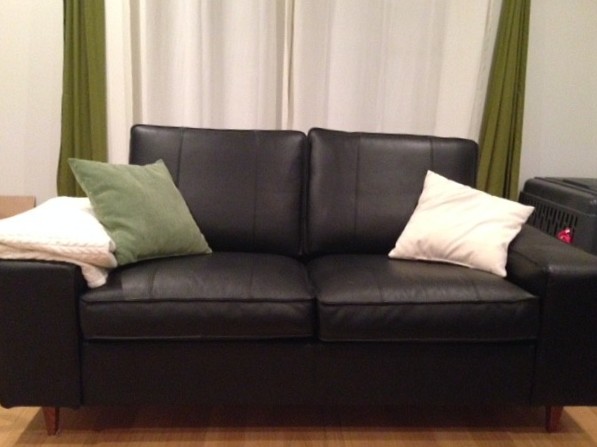 |
| Front (Dog kennel is not a recommended design element on any blog) |
I won’t be taking the legs off and as indicated on all the
advice blogs, the natural light coming in from under the couches for this
narrow living room truly make all the
difference. Blocking out that light
in our tall ceiling narrow living room was not a good choice, so I am happy
about this change. The couches feel
extremely sturdy and I was pleased with my handywoman efforts. But my number one recommendation would be to actually measure the size leg you are considering buying on a piece of paper, cut it out, and putting it up against the sofa to see if the size makes sense.
Oh, and in terms of the leather choice- so great. I was surprised that the leather felt nice
and soft after a very short amount of time and the couch has held up great to the
dog, who has taken to sleeping on it.

-C
Monday, August 31, 2015
Soup Stock
I only started to hate buying chicken stock when I no longer had a car. Hauling even 4 Litres of chicken or vegetable stock was a chore, and it meant I couldn't buy milk at the same time. It also cost $10 for 4 litres of stock, which just seemed bizarre.
At some point, I decided there had to be a better way. I turned to the internet for advice.
Chicken and vegetable stock, as it turns out, basically makes itself when you are making a chicken soup. You boil the bones you were going to throw away, along with the parts of the vegetables you weren't going to use. You toss it in a big pot with salt, a few spices, and boil it. Then you strain it!
Here is a recipe for you: http://www.simplyrecipes.com/recipes/how_to_make_chicken_stock/
And another: http://www.simplyrecipes.com/recipes/how_to_make_chicken_stock/
This is generally how I do it:
Of course, I don't put my chicken stock in adorable little mason jars like the ones linked above. I either make it into a soup right away, or I freeze it in Tupperware. There are health benefits to making your own stock, and it definitely is less salty. I can't imagine going back to the canned stuff and think of all the money you can save!
Here is a picture of the messy work!

At some point, I decided there had to be a better way. I turned to the internet for advice.
Chicken and vegetable stock, as it turns out, basically makes itself when you are making a chicken soup. You boil the bones you were going to throw away, along with the parts of the vegetables you weren't going to use. You toss it in a big pot with salt, a few spices, and boil it. Then you strain it!
Here is a recipe for you: http://www.simplyrecipes.com/recipes/how_to_make_chicken_stock/
And another: http://www.simplyrecipes.com/recipes/how_to_make_chicken_stock/
This is generally how I do it:
- 1 roasted chicken carcass (Safeway chicken for $8.99)
- 1 large yellow onion cut up into chunks (no need to dice)
- 1 tablespoon of diced garlic (you could also just press your own)
- Leftover celery and carrot
- Salt and pepper
- Thyme (small amount)
Of course, I don't put my chicken stock in adorable little mason jars like the ones linked above. I either make it into a soup right away, or I freeze it in Tupperware. There are health benefits to making your own stock, and it definitely is less salty. I can't imagine going back to the canned stuff and think of all the money you can save!
Here is a picture of the messy work!

Subscribe to:
Posts (Atom)